It's been a bit over a year since the finishing strip of moulding was applied across the top of the original range hood in our remodeled kitchen. And we could not be happier with the function of all of the elements. The highlights for me are the 48" Wolf Rangetop with its centerpiece Wok Burner, a Magic Corner II spice rack and a Create Good Sinks ledge workstation. My husband is equally delighted with his Rev-a-Shelf KitchenAid cabinet lift and 30" Wolf Wall Oven. The kitchen is definitely the center of life in our home, and we designed this kitchen around cooking with friends.
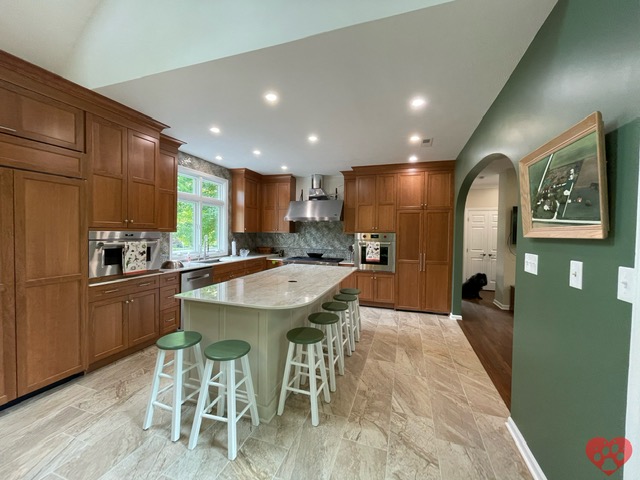 |
| A functional, but not quite complete kitchen renovation. The EnergieKer floor tile is non-slip even when wet. |
 |
| Before - the original cabinetry and appliances |
 |
| Dining area |
It was the range hood that sold the house for me, but my husband took a bit more convincing. We were looking at a 20-year-old house that had a great location, walkable to restaurants and shops, with bike trails and both flat and hilly options nearby for exercise. But whoever designed the layout of the kitchen had evidently not spent much time cooking, at least not using ingredients typically kept in a refrigerator...
The kitchen was large, but closed off from the rest of the house with two doorways converging into the same corner, one devoted to door swing but little else. There was a large central island with two levels, a regular height section facing the sink and an elevated bar on the other side facing the refrigerator and pantry. You heard right. In order to wash your salad greens, you would either have to vault over the island or toss your ingredients over the bar top hoping they would land on the counter on the other side.
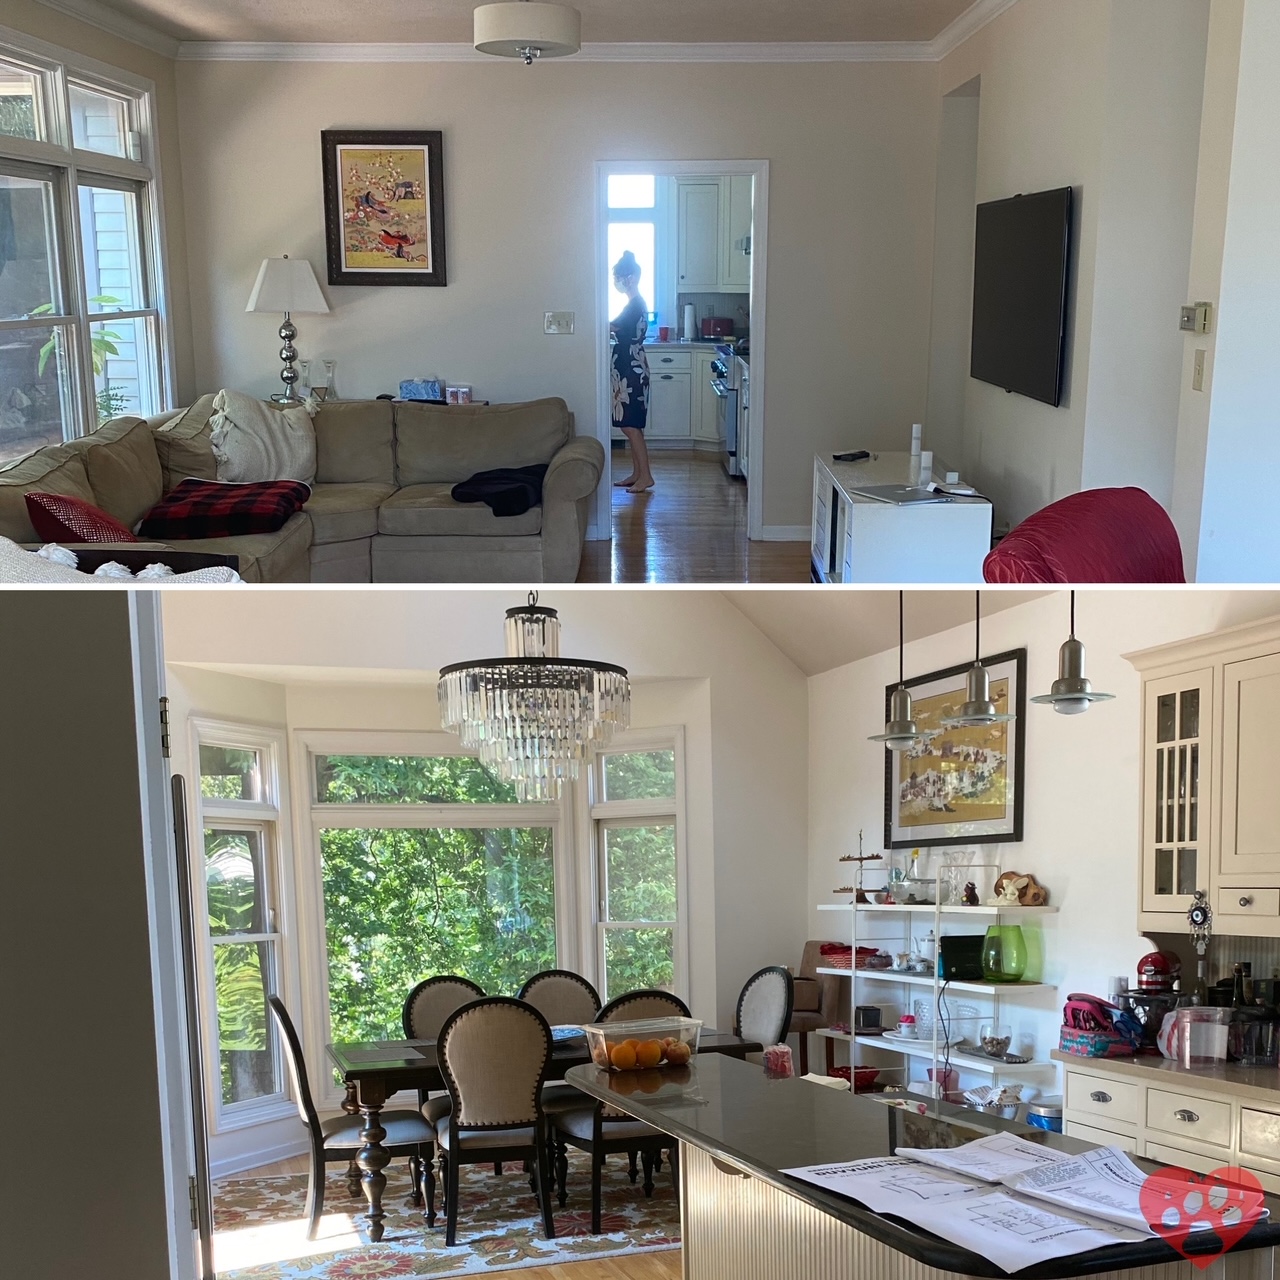 |
| Before: view from family room into kitchen (top) and view of dining area from doorway (bottom) |
On the plus side was a lovely old Thermador stove. Indeed, the first time I cooked with that stove, I almost regretted our decision to replace it with the Wolf rangetop -- almost. The wok burner is a complete delight to use. Click here to read about the flexibility and benefits of cooking in woks, and the geometric requirements to achieve wok hay!
The kitchen had light wood floor, which we decided had to go in favor of slip-resistant, waterproof tiling, and a beautiful bay window overlooking the river on the far end.
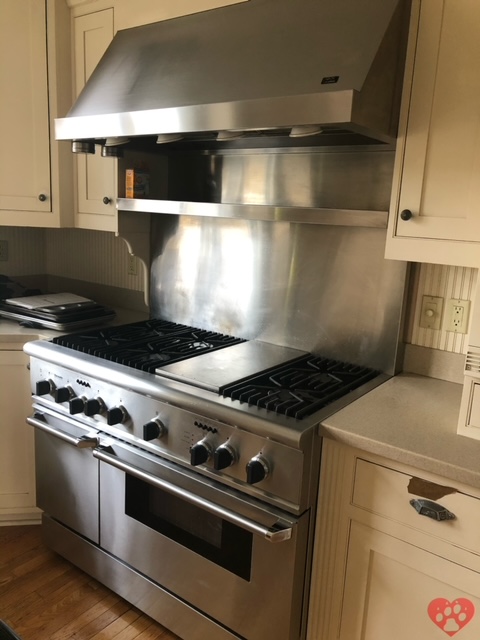 |
| Thermador with 6 burners, a somewhat functional central grill, and two ovens |
In many of the high end townhouses we had been viewing, the range hood was there just for show. Often the realtor did not even know if they could be turned on, and most often, they were not vented to the outside. So I asked them to turn this one on so that I could see if the vent flap was operational. As I stood below on the driveway outside (the kitchen is on the second floor), the outflow from this hood was powerful enough to lift my hair.
Reconfiguring the Kitchen
We wanted the kitchen to be open to the living room because our guests always end up hanging out in the relatively confined space of our old kitchen. It was surprisingly hard to find smaller houses or townhomes that would allow the kitchen to be in a central location. Instead, a common configuration is to push the kitchen to one end, separated from the living/family area by having the dining area in between. Indeed, that was the original configuration of this house, except that the prior owners used the breakfast nook off the kitchen as the dining area, and converted the formal dining room into part of the living room by taking down a non-support wall in between.
We wanted to encourage guests to relax on the couches and coffee tables while still being able to converse from the kitchen. But this would require removing a support wall behind the refrigerator and pantry. So we brought in a fantastic builder, architect and design team to help us access feasibility before buying the house (details in the Love2Chow Tips section below). As we loved the archways that had been present in the house we rented after we were married, they put in a beam and framed an arched opening beneath it.
 |
| View from family room into kitchen after renovation |
The corner formerly dedicated to door swing was closed off to become a small walk-in pantry. The refrigerator was moved to the end of the sink/dishwasher counter, and we moved the microwave to that area as well. We also added a built-in bookcase to house my recipe book collection.
Appliances
In an earlier blog post, I had detailed my search for the perfect indoor wok stove. Joining the Facebook group Wok Wednesdays changed my life, and I moved from being a wok skeptic to a wok aficionado. So we walked into the appliance showroom knowing we wanted the Wolf 48" Sealed Burner Rangetop with the 35,000 BTU wok burner (Model # SRT484W). The bowl of the wok is recessed below the surface of the rangetop, just as it would be in a traditional Chinese wok hearth. I was able to get a great price as I ordered it when it first came out, so new that the dealers had never seen one.
 |
| It took some persistence, but range top and oven are a comfortable height for 63-70" people |
We selected a wider, but shallower refrigerator (so fewer things could get pushed into the nether regions to be forgotten until the biodiversity thus fostered announced itself unpleasantly). The refrigerator in our old house had two opposing doors that would sometimes fail to close correctly. And when preparing to move, we discovered long-lost items in the depths of the freezer, which was basically a large, deep bottom drawer with a few dividers.
The Sub-Zero 48" Classic Side-by-Side Refrigerator B1-48SID/O solved all of these problems. It has a straightforward single door for the wider refrigerator side on the right, and a single door for a full-height freezer with many shelves and baskets. Just from reading reviews, we were leaning towards the internal water dispenser. After tracking down a floor model in a showroom, we discovered that the external water dispenser was too short to fill a standard hiking water bottle. The internal dispenser is tall enough to accommodate the tallest beverage container, but does need two hands to operate (in contrast to our old KitchenAid).
Given that everyone in the kitchen always converged at the stove, with people ducking around my legs to try opening the oven while I am standing there stir-frying, we knew we needed to separate cooking and baking spatially. After imagining lifting large heavy, burning hot pans out of showroom double ovens, we decided to get a single wall oven. The upper oven would be too tall for me, with the hot door opening to a level just below my armpit, and neither of us wanted to bend over to a floor level oven. We set the bottom of the oven above a 24" tall lower base cabinet. Instead of the standard 2 roll-outs, we added a third roll-out to accommodate more baking dishes and pie pans with less stacking required.
 |
| Three pullouts for shallow baking pans beneath the oven. Instead of half-inch wood dividers for the baking pans that require a fixed shelf above, we opted for thin metal dividers with adjustable shelves above. |
We considered a steam oven, as a friend loves hers. But ultimately, the oven is my husband's domain. He did not want extra frills that could malfunction. I guess if he ever gets around to trying to perfect a crusty French loaf, he will have to reach for an inexpensive mister. We selected the Wolf M Series Professional Wall Oven (SO30PM/S/PH) with the classic red knobs. While the transitional and modern profiles looked sleek, we discovered it was a pain having to scroll to the desired settings. With the knob, everything is much faster. Plus there is something satisfying in turning a knob.
As leftovers and hot beverages are the most frequently microwaved items in our home, we moved the microwave to the cabinet unit next to the refrigerator. Although it is built in, we selected counter height after hearing that the under counter drawer units were not as convenient to use. We opted for a multi-function speed oven that could be used as a second oven in a pinch, the SPO30PM/S/PH. Although this is a little weaker than a standalone microwave at 900 watts, it can also be used as a convection oven suitable for handling Thanksgiving extras or roasting an extra turkey breast.
By ordering at least three major components from Wolf, we got a bit of a rebate, and our choice of a free small appliance. After reading poor reviews for the toaster oven, we are very happy with the blender that we selected.
Cabinetry
We loved the soft touch operation of Crystal Cabinets, opting for Cherry wood with the Salem stain and doors in the Freeport/French Villa Square style. For the island, we examined samples for all of the neutrals and found that Sand Dollar perfectly complemented cabinets, countertop, wall paint, trim and floor tiles. The brushed satin nickel Atlas Homewares Malin pulls, ranging from 3 3/4" to 18" for the refrigerator, and the Malin 1 1/8" mushroom cabinet knobs set off the cabinetry perfectly, with no stray ends to catch and tear clothing.
 |
| Pantry has a 12" deep cabinet above the doors, but the shelving continues up behind it to the ceiling |
We arranged to have the refrigerator and pantry doors paneled in a roughly symmetric fashion, setting off the two ends of the kitchen area. For the inside of the pantry, we designed custom L-shelves with a rounded front corner. The back shelf is 14" deep, allowing good visualization of items to the back, with 8" deep side arms the perfect size for cereal boxes. The shelves extend all the way up to the ceiling, behind the 12" deep cabinetry archway.
We opted for roll-out shelves in most of the lower cabinets, with some toe-kick drawers for serving platters. To save my shoulders, and enable the pow action in wokking, I dropped the counter height on either side of the Wolf rangetop by 3 inches. This was a compromise so that the cooking height would still be comfortable for my husband. In the cabinets below, I selected the pin holes that would enable me to keep my taller Revere Ware stock pot below a shallower roll-out space for pot lids. On the other side, the space is evenly divided, allowing me to keep my Cantonese style woks stacked up in the upper tray, and my long-handled pow woks in the lower tray.
For my spices, I had been using a two-tiered corner cabinet lazy-Susan, but I like my new Magic Corner II a lot better. This device comes built into the blind corner cabinet and features four shelves. As you pull the front two out and to the left, the back pair move into view so you can access all 4 at the same time. This allows me to separate my spices by continent to more easily find spices that are commonly used together, with frequently and universally used salts, peppers, chiles and a small cooking sugar container in the top, front section.
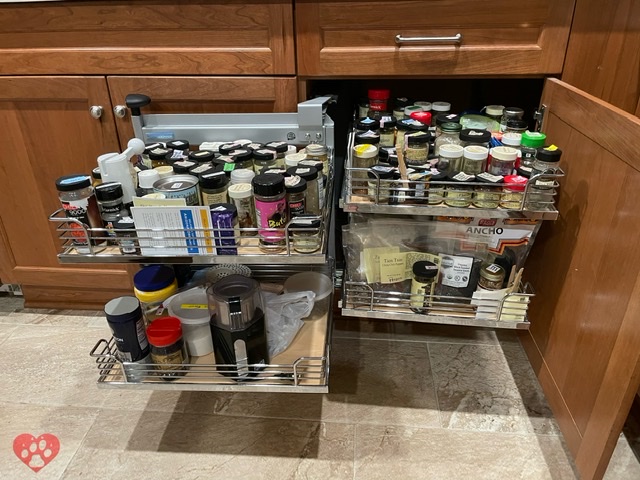 |
| The Magic Corner, an efficient way to use the storage space in the blind corner, with all shelves pulled out. Unlike the rotating round corner units, it does not extend into the other leg of the “L”, with only a 1” spacer needed for my oil/vinegar pullout (see below). |
We got a mixer lift for my husband's KitchenAid to place at the end of the island in a 18" cabinet, and after some discussion, managed to get a small pullout for accessories below. Initially, we were told that there was not enough room beneath the mixer lift, but after showing them photos of the same lift with a drawer beneath that we found online, he figured out how it could be done. Instead of ordering the mixer lift cabinet unit, he ordered a standard cabinet with a single roll-out on the bottom, and a compatible Rev-a-Shelf mixer lift that had to be installed by our contractor.
Likewise, we were initially told we could not get roll-outs deeper than 21" for our 43 9/16" deep island. So they proposed standard 24" deep cabinets facing the sink, with a 12" deep set of cabinets facing the other way. But it seemed those cabinets would not be easily accessible through the bar stools and it cut the knee space for the bar stools to only 6-7". Again, after I found directions on the internet for how to configure extra deep roll-out shelves, suddenly it became possible to order 27" deep roll-outs to go in a single set of 30" deep cabinets -- a lot more useful with a more comfortable 12-13" knee space. The toe-kick drawer for the island was 24" deep, because of the recess for the toe-kick area.
Although we had 15.5" of space in the corner to the left of the range, due to a drawer pull conflict we needed a spacer and could only fit the 448-BDDSC-8C spice pull-out with a shelf width of only 8". This is the same Pull Out Spice Kit we had in our prior house, and I had looked forward to expanding it to the 11" wide shelves of 448-BDDSC-11C. The solution was to shrink the pantry by an inch, which allowed us to add 3" to the width of the pull out. Even so, the Pull Out Spice Kit was in no way large enough for my spice collection, so I removed a shelf and am using it for vinegars and flavored oils. To make it easier to adjust shelf height, I asked the contractor to drill out the peg holes so that they can drop down from above onto the pegs. If all four pegs have to be inserted from the side, you would have to disassemble the entire apparatus to change the shelf height.
 |
| With removal of one shelf, the spice rack is perfect for oils, vinegars and sauces (left). We asked our builder to drill out the bottom of the peg holes so that the shelf can be lowered onto the pegs. |
While the option to have a step ladder stored in a toe-kick drawer seemed attractive, when we dug in deeper, we found out that the ladder was only 14" high, but would occupy the entire 30" wide base. We are still using our old folding step ladder, refurbished with new rubber feet to protect our floors, which we store in the pantry.
The pull out trash kit ended up not fitting in the cabinet under the sink despite our calculations. While it did have the 1/8" predicted clearance below the bottom of the sink, the pipes in the back of the cabinet prevented it from fitting front-to-back. In retrospect, we might have been able to get them to put everything on the left side, so the pull out could go in the right side. However, it is absolutely packed in there, so it was better to just move the trash and recycling bins into the pantry and sell the unused hardware. Likewise, our reverse osmosis water purifier system from Gordon Bros conflicted with the towel rack, so we put it into a bathroom cabinet instead.
Workstation Sink
I had grown up with double bowl sinks, filling one side with soapy water and the other with rinse water. But there is always that baking pan that does not fit and has to be washed while balanced over the divider. Our friend strongly encouraged us to get a farmhouse sized single bowl sink.
After extensive research on workstation sinks, I am so glad I found this small company in Ohio. Create Good Sinks has many features to like, including the 1/2" radius that makes cleaning the corners a breeze. After considering different widths of kitchen base cabinets, I decided on model 5LS33L. Placing the drain towards the rear corner closest to the dishwasher gave us a lot more usable space under the cabinet, without which our water purifier system would not have fit.
The people at Create Good Sinks were very helpful. They sent me a video showing how water drains in the sink. Although there is no slope, the water drains beautifully due to subtle grooving in the base. Indeed, I seem to recall they mentioned that they unpack every sink received from the manufacturer to examine it, testing drainage using ball bearings. Drainage is one of the most frequently mentioned problems with these large workstation sinks, and the other option I considered was the Kraus 32" with offset drain that has a 1/2" slope across the length of the basin. Create Good Sinks adds a layer of paint on the underside of the sink, which together with the rubber pad act to absorb sound for a quieter experience.
 |
| Preparing stuffed poblano peppers using my new 33" workstation sink |
I went ahead and purchased the Ledge Accessory Package, with 15" cutting board, colander, rollup drain mat and the sink grid. In addition, I ordered the Stainless Steel Beverage Tub, which has drainage holes, but also has a silicon plug so it can be used like a second sink bowl to hold soapy water. In a later post, I will show how the sink and accessories perform for various cooking tasks.
We had originally planned to keep the existing Arctic Stainless Addison Single Handle kitchen faucet with Touch2O. However, our sink was too deep front to back to allow full operation of the faucet. We really have to thank our careful countertop fabricators for pointing this out to us. Turning on the cold water would have run the handle into the backsplash.
Even thought we might have had some leeway accommodating part of the handle in the window recess, I did not want to take any chances as Dekton cannot be modified on site. So I gave the faucet to one of my students and searched for a zero clearance single hole faucet. The Kraus KSF -1610SFS Bolden Touchless Sensor Pull-down 18" kitchen faucet was the perfect solution. The handle stays vertical for cold water and moves forward 90° in full hot water mode so it can go right up against the backsplash. To control flow rate, you tip it farther to the right. There is an extra piece that allows for a greater flow rate if allowed by your state (so don't pitch the box - I noticed it when salvaging the manual out of the trash). And if you have a coin, you can easily switch off the sensor function so the faucet can still be used during a power outage.
Design & Details
I sent our team a few images of kitchens I liked, and our designer came up with some beautiful options for us to select among. She traveled with us to view countertop options, bringing tile, paint and cabinet samples, and transmitted ordering details to the construction team. Our architect worked in the archway, ladder and designed the cabinetry facade, and the cabinet makers and construction team made it all come to life.
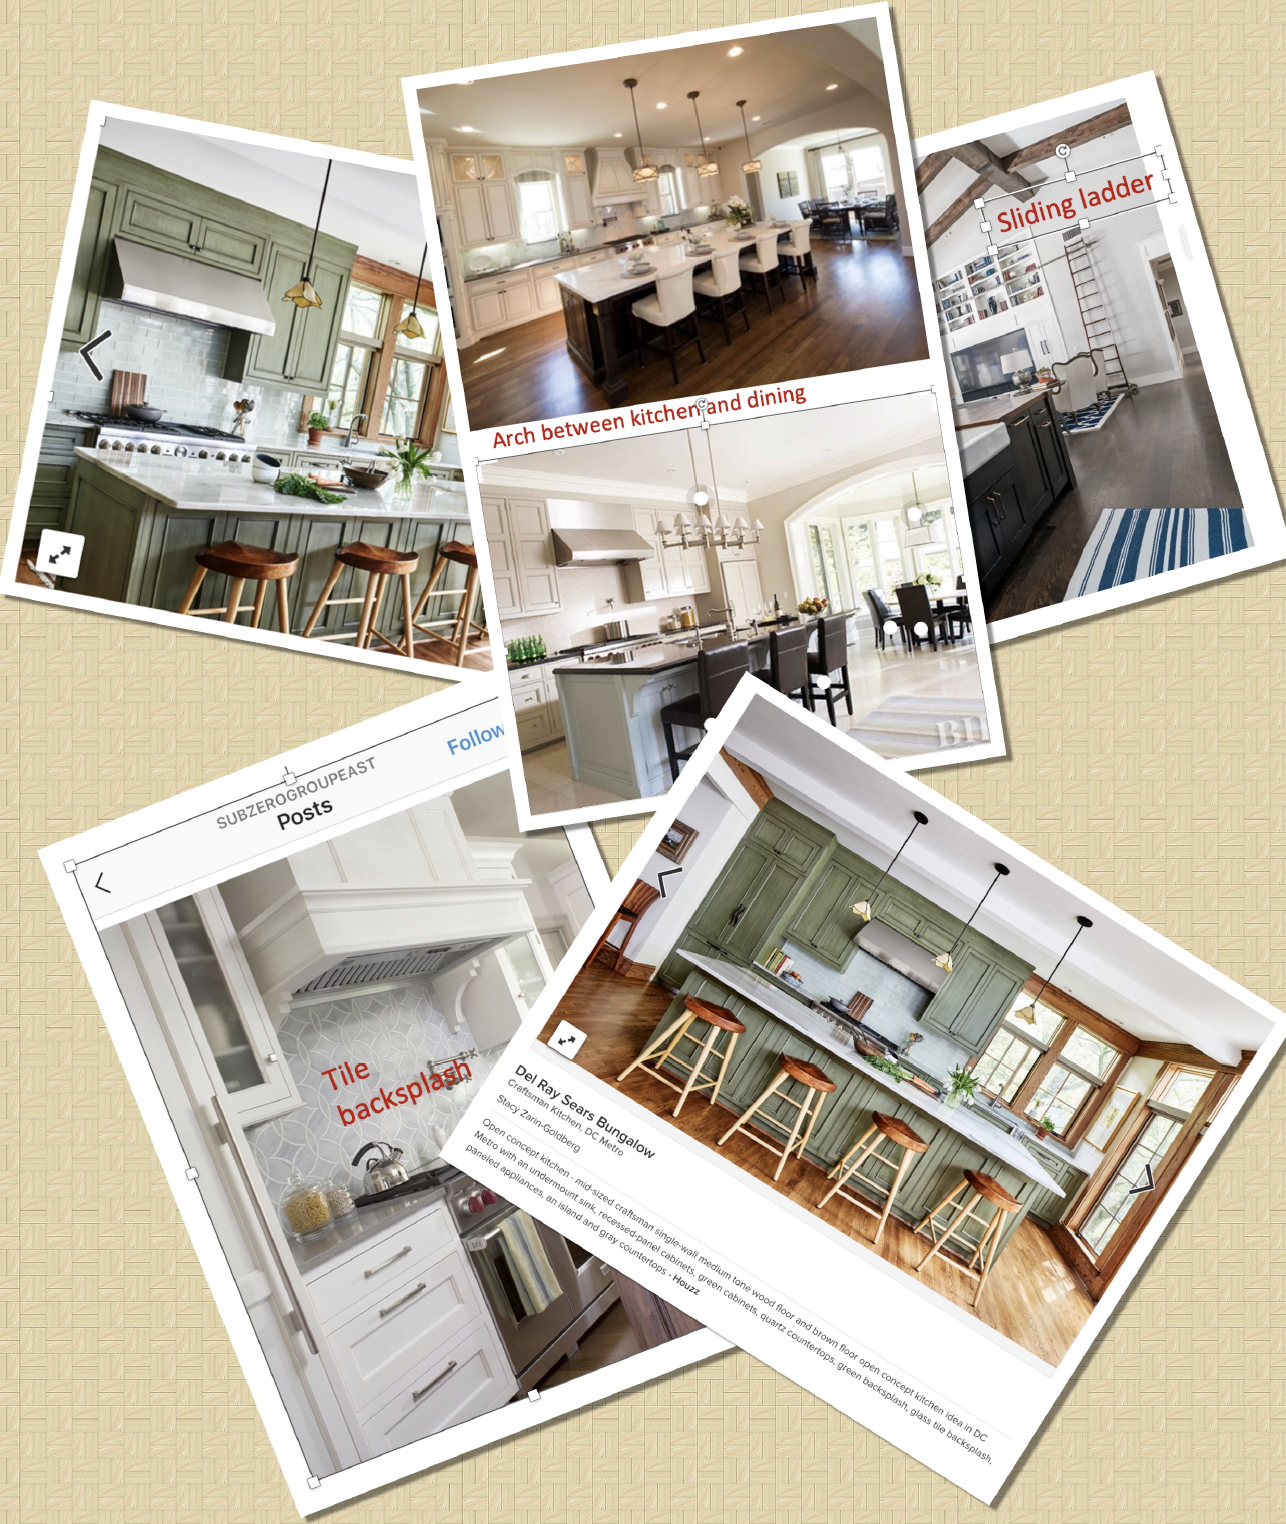 |
| I loved the appearance of the Del Rey Sears Bungalow featured on the Houzz website the best, full of light with its muted greens and reddish browns. I also collected other photos that had specific elements that I liked. |
Backsplash
The Angela Harris Dunmore collection features Cuban-inspired pieces, with earthy greens and tropical blues. The minute she showed me the 8 x 8 Savona tile, I knew it was the right tile for my kitchen. The pattern was abstract, but reminded me of olives and leaves. To set off the angled tile from the tiles laid against the countertop, we used the coordinating green 1 x 8" ceramic pencil liner.

Countertop
While I love my former granite countertop, it was disappointing to realize that while granite itself could take extraordinarily high temperatures, the sealant used to prevent liquids from seeping into the pores could not. So we selected Dekton for our kitchen countertops. Dekton is a glass-based material impervious to cold or hot temperatures. It can be used indoors or outdoors. You just should not drop heavy things on it. Dekton is difficult to work with, and we were fortunate that our builder referred us to Ultimate Granite. They did an impeccable job, and for a great price!
We loved several options in the Stonika collection, made to resemble natural stone. On its own, we preferred the Taga. Inspired by the Taj Mahal, Taga's crystalline and marble veins is supposed to evoke prestige and gentle warmth. But the stormy greys were too strong in this pattern, competing with the backsplash for attention.
So we opted for the Arga, which features a creamy white background with subtle brown and gold veins and a hint of misty grey. Once I saw it installed, I knew we had made the right choice. It works equally well with our cherry cabinets, sand dollar cabinets and a navy blue cabinet in our entry.
For our island, we added a pop-up outlet so that we could enjoy fondue. This small item took a bit of back and forth with the builder, kitchen people and ourselves. Although simple, the easiest place to put it would interfere with the ideal spot for a fondue pot shared among the four people sitting around the curved end of the counter. Plus, placing the popup in the back of the appliance cabinet, 12-15" from the end of the island, would mean there are no other outlets for 6.5 feet of island length. The solution was to shorten the middle cabinet upper drawer from 27" deep to 21" deep, allowing room for the outlet to descend. The popup would be positioned nearly midway down the island (40:60), a little farther from the end facing the stove that had a power strip. With this configuration, no cord would have to reach farther than about 3 ft. to cover the island.
Paint
Our walls were done in Benjamin Moore 446 Pinelands with OC-57 White Heron, our house neutral color, on the ceiling. This is described as a classic bright white with a slight cool cast, and it worked with both our warm and our cool toned rooms.
Tile
After slipping and sliding on our prior entryway tiles, we wanted a kitchen floor with a high coefficient of friction even when wet. Our designer selected a beautiful Italian porcelain tile called Utah Desert by Energie Ker. The 12 x 24 inch pieces look like natural stone. The dynamic coefficient of friction actually increases from 0.71 to 0.74 when it is wet, which means you are even less likely to slip. I tested this on the sample tile by adding some water and trying to slide my foot across it.
Metal Work
Lighting would end up being more difficult than imagined. Our bathroom selections kept going out of stock and the builder's young assistant threw away boxes containing the frosted glass pieces before they could be installed. The first set of chandeliers suggested by our designer did not excite us. But we did like the Mobius collection from Hubbardton Forge. We ended up ordering the Mobius 12-light pendant in bronze with spun frost shades - like white lilies.
Due to the height of our dining area ceiling, we ordered a custom adjustable stem. Of course, the builder did not know it was adjustable, and it was initially placed much too low. Secondly, due to the fact that we had a 5' round table, the chandelier was centered too close to the end of the island and had to be shifted by about 1.5 feet towards the window. We originally ordered a chain so the wire could be swagged, but found that would not work with the style of chandelier. So we had to build a false ceiling to move the chandelier base.
The final touch was to add the sliding bookcase ladder that was easy for the architect to draw, and difficult to implement. Existing ladders would have protruded too far, interfering with chairs around the table. Thankfully, our contractor foreman knew a metal worker named Will, who came out and built us a custom ladder with a low profile, that slid on skateboard wheels. Will experimented with blending colors to create just the right shade to complement our wood while reflecting the color family of the nearby chandelier.
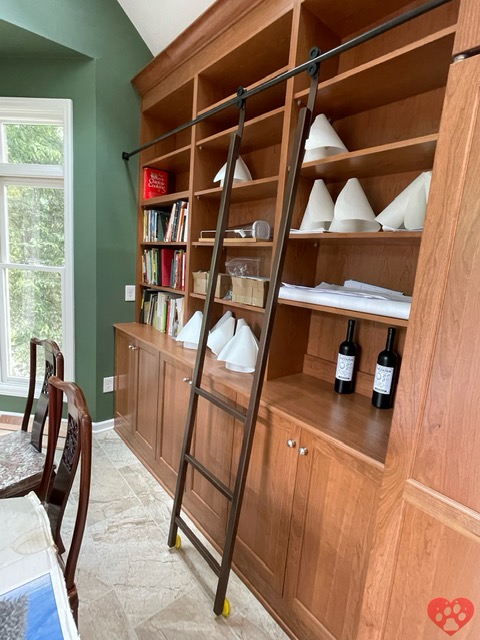 |
| Testing out the ladder before the chandelier was assembled. The final version had black wheels. |
He also built us a beautiful wine rack from the same color metal, which fits perfectly with no wasted space in the bookcase unit next to the refrigerator.

Finally, he was called at the last minute to solve another problem. The chimney for the range hood had been mostly hidden behind cabinet doors. In our new kitchen design, no one noticed that the 10" pipe would be exposed as the existing chimney was too short to cover it without the cabinetry. Will was tasked to fashion a stainless steel chimney that blended seamlessly with the hood unit, and one of the Shly workers named Paul was able to take leftover cabinetry trim pieces to create a nice transition as we did not have any extra moulding.

Click here for additional options for wok cooking in a Western kitchen.
Love2Chow Tips:
🐾 Study every detail of the quote and schematics as errors do get introduced. Although we had sent the specs for the Microwave Speed Oven, an adjustment was later made to improve the aesthetics of the crown molding by someone who assumed it was a regular microwave and made the cabinet too shallow. We had to get that changed back to 24" to accommodate the 23" deep Microwave Speed Oven.
🐾 Don't forget outlets for waste disposal, air switch, AC adapters for faucets and other things that need to go under the sink. Also, despite our best efforts, the outlet for the KitchenAid inside the lift cabinet got placed too low for the cord to reach, so we had to get an extension cord.
🍃 The prior sets of owners kept meticulous files with all the original manuals. The range hood, which was salvaged from the demolition and reused, was from Best by Broan Model K260A. We also saved the kitchen cabinet knobs and pulls that we repurposed for elsewhere in the house.
🐾 Builder: Shly Construction We could not be more satisfied with Shly and the job they did in bringing the renovation to fruition. Our foreman Mike had a great depth of knowledge and was a true problem-solver. He did an impeccable job of coordinating nearly the entire job.
🐾 Architect: Pavel introduced us to Mark, who introduced us to Cathy, to form our dream team. Mark tracked down the original builders and other experts to ensure not only aesthetics, but also the structural integrity of the project.
🐾 Designer: Davin Interiors Cathy and her team did an impeccable job that touched every area of the house. They helped winnow through overwhelming numbers of choices to present us with suggestions, learning quickly what we liked and pivoting to solve unexpected issues as they came up.
🐾 Appliances: Don's Appliances We traveled to many showrooms and everyone was always very helpful, especially at the McKnight location, even after we had already placed our order at the Hillmon Appliance Distributors location.
🐾 Countertop: Ultimate Granite & Stone This small local company did a fabulous job on our Dekton countertop. The prices were extremely reasonable, the workmen skilled, and the management was flexible. We forgot to order the countertop for an entry cabinet, and they were able to determine at the last minute that there would be enough Dekton leftover from our kitchen fabrication to be used.
🐾 Cabinets: Crescent Baths & Kitchens We worked mostly with Dave, who was absolutely fabulous. He is detail-oriented and his measurements and calculations were right on.
🐾 Metal work: Will of Sftdrv did a beautiful job on the ladder and wine rack. He also helped us with getting the grill underneath the refrigerator to fit around something and affixed a new knob on one of my beloved 30-year-old Revere Ware 12" skillet lids. (My mother's 50+ year old lid still has its original black knob, but the metal handle on mine fell off).
🐾 It is good to know that depending on your state laws, you may not have to pay sales tax for countertops or cabinets or flooring installed by the company you buy them from, because they are considered property improvements.
WHAT ARE YOUR FAVORITE KITCHEN DESIGN ELEMENTS?
Please post comments below or photos to Instagram, Facebook or Twitter
Tag @love2chowblog and hashtag it #love2chow
All photos and content © 2022.
All Rights Reserved. Contact admin@love2chow.com for permissions.
All Rights Reserved. Contact admin@love2chow.com for permissions.


0 comments